不知道大家在开发的时候会不会使用到 UIView 的 autoresizingMask 属性。我自己的话自从开始出现 autoLayout 就没再用过了。前几天翻看一些较老的书籍,发现了它静静躺在角落。不知不觉还真的有些忘记了,于是温故知新,再学习了一下。
autoresizingMask
它对应着一个枚举,属性是自动调整 SubView 和 SuperView 之间的位置和宽高。
enum {
   UIViewAutoresizingNone                 = 0,
   UIViewAutoresizingFlexibleLeftMargin   = 1 << 0,
   UIViewAutoresizingFlexibleWidth        = 1 << 1,
   UIViewAutoresizingFlexibleRightMargin  = 1 << 2,
   UIViewAutoresizingFlexibleTopMargin    = 1 << 3,
   UIViewAutoresizingFlexibleHeight       = 1 << 4,
   UIViewAutoresizingFlexibleBottomMargin = 1 << 5
};
简单介绍
UIViewAutoresizingNone
不设置自动调整,默认值
UIViewAutoresizingFlexibleRightMargin
这里就只讲 UIViewAutoresizingFlexibleRightMargin ,因为上下左右四个方位是一致的原理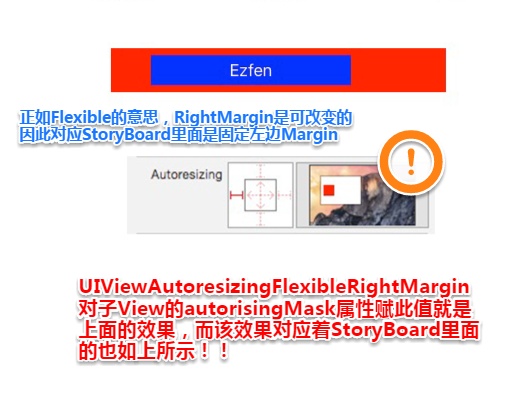
UIViewAutoresizingFlexibleWidth
UIViewAutoresizingFlexibleWidth 和 UIViewAutoresizingFlexibleHeight 也是同样的原理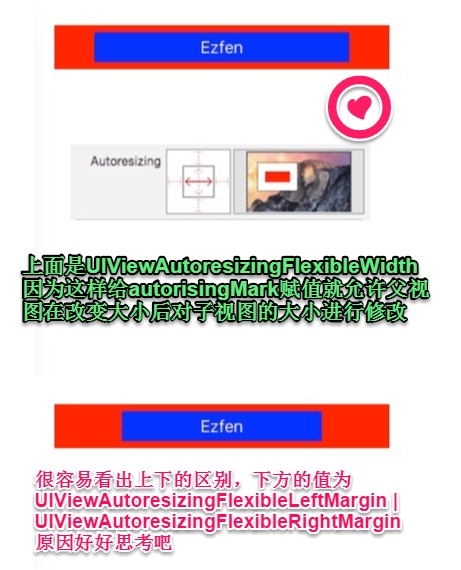
组合起来
枚举中的值是允许使用|组合起来的,同时拥有多个值的功能,like this:
UIViewAutoresizingFlexibleLeftMargin|UIViewAutoresizingFlexibleRIGHTMargin表示左右间隔都可以修改,效果就像上面那张图一样~
有点代码对比会好些
#define kTopSpace 64
#define kMargin 20
#define kTopViewHeight 44
#define kTopViewWidth 280
#define kTextLabelWidth 200
#define kTextLabelHeight 30
//以Iphone4(320, 480)为基础,设置各控件的位置
//注意:必须所有控件都按照Iphone4(320, 480)为基础初始化一次,不然按比例缩放时会发生错误!
UIView *topView = [[UIView alloc] initWithFrame:CGRectMake(kMargin, kTopSpace, kTopViewWidth, kTopViewHeight)];
CGFloat textLabelTop = (topView.frame.size.width - kTextLabelWidth) / 2;
CGFloat textLabelWidth = (topView.frame.size.height - kTextLabelHeight) / 2;
UILabel *textLabel = [[UILabel alloc] initWithFrame:CGRectMake(textLabelTop, textLabelWidth, kTextLabelWidth, kTextLabelHeight)];
//设置文字及居中
[textLabel setText:@"Ezfen"];
[textLabel setTextAlignment:NSTextAlignmentCenter];
//分别设置样式
[topView setBackgroundColor:[UIColor redColor]];
[textLabel setTextColor:[UIColor whiteColor]];
//设置文字控件的宽度按照上一级视图(topView)的比例进行缩放
[textLabel setAutoresizingMask:UIViewAutoresizingFlexibleWidth];
//添加视图
[topView addSubview:textLabel];
[self.view addSubview:topView];
//注意:重新设置topView位置的代码,必须要写在添加视图的后面,不然autoresizing的位置计算会出错!
CGFloat topViewWidth = kUIScreen.size.width - kMargin * 2;
[topView setFrame:CGRectMake(kMargin, kTopSpace, topViewWidth, kTopViewHeight)];
上面的代码中尺寸宽度被限定为 iPhone4s 的 320 。没有设置子 View(蓝色的 View )的 autoresizingMask 属性的话运行结果如下: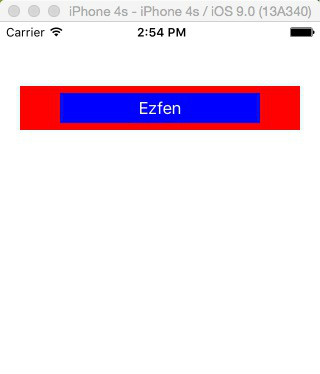
设置了子 View(蓝色的 View )autoresizingMask 后,再修改父 View 的宽度,可以看到随着赋值的不同,有不同的效果:
设置了 UIViewAutoresizingFlexibleLeftMargin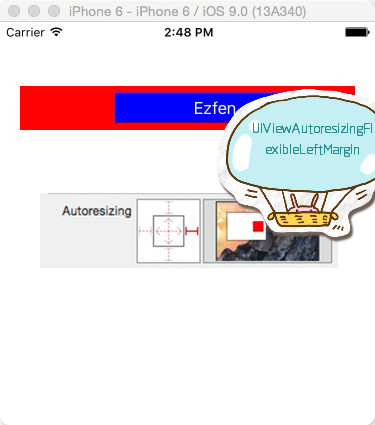
还有的其他值对应的效果图在上文已经摆出来了,请参阅哈~~